Showing posts with label Unity. Show all posts

Saturday, June 1, 2019

Quain Courtyard pt 4, mild success

I have written before about getting game ready assets, but this time I approached scanning in a totally different way. Actually, I think it was ultimately a bad way to do this. Plus, I realize a lot of things here that simply need to be redone.
https://drive.google.com/open?id=1yHXE2Gp5NKyeFHSFZbfRDL9HpJDpTSiC

Note the screenshots are totally out of order. I've added captions for clarity


Unity's expert guide goes into various definitions of capturing different types of objects and emphasize collected different pieces. So I decided to strategize and break up the space according to... what felt right... and now I've learned what worked and what didn't.

I've talked about preparing game ready assets in my previous projects.
These are the steps I used this time:

1. In Zephyr, make a clean selection of the dense mesh. Generate mesh, then texture mesh.
2. Decimate the mesh to something reasonable. (*you could export out and retopo and UV here) Generate textured mesh again for the lo poly mesh.
3. Export both, and enable resize to single texture.

4. In substance designer, load both.
5. Open the lo poly mesh in the baker. Assign the high poly mesh.
6. Bake all maps

7. Import lo poly mesh and all maps into unity
8. Create new material (or dupe existing material to reuse settings) plug in maps

--

Overall, some combinations worked better than others.
this one looks okay
I thought I could optimize this asset by capturing around the edges...
...and filling in with a material. In reality, I'm not saving that many polys.
scan vs model

maybe both?
surprisingly pleased about this one, however the scan quality is lacking. but the two decorative pieces merged well.
too many things overlapping...


Things that are going wrong...
  • My world scale is so completely wrong. Photogrammetry is not a precise method and so, the reconstructions were all over the place. I should have centered all my assets before exporting. I found myself nudging rotations back and forth, baaaack and fooorth, scaling by 70-80% down, carefully eyeballing everything into place. Plus the Z-up axis didn't help. Actually I'm really glad I had the 360 reconstruction (layout pass) to help place everything.
  • ARGH!
  • The materials I generated in Alchemist didn't totally translate over to Unity. I kind of expected that, but one thing I got really stuck on is the vertex displacements. The height maps look so pretty in Substance! And after some research, I realized you can in fact, do real geo displacements
    https://blogs.unity3d.com/2019/02/12/creating-an-interactive-vertex-effect-using-shader-graph/

    But right now I'm stuck on this issue
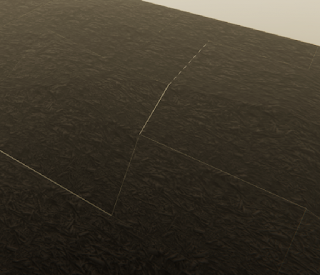
    the height separates the faces


    In which, increasing the height value does not displace the silhouette of the mesh, but instead, causes these separations between faces. I need to ask someone who knows more about shader devving to clarify whats going on.
  • The other issue I had with material scanning was texel density, again, due to mismatched world scale elements. Currently, if the game camera is more than a few feet away from one of the materials I made, the repetitions become obvious. While yes, it is tileable and somewhat parametric document, I can't make up for the texel scale issue. That is, if I want my bricks to be brick sized, the material has to repeat dozens of times. Even in something as random as the concrete (which had an extra randomizing filter on it) the repetitions are obvious when they're far enough away.
    I should have listened to Unity, and photographed a meter square to ensure a meter of texel density.
  • Foliage is totally out of scope.
Things that went right
  • The HDRP is a dream to work with. As the director of one of Unity's short film demos describes it: "High Definition Render Pipeline (HDRP), which — from an artist perspective — just automatically makes things look nice." https://blog.siggraph.org/2019/03/an-irresistible-way-to-make-films-using-real-time-technology-for-book-of-the-dead.html/
    • Actually this is a really exciting observation for the state of computer graphics... tools like the HDRP and Alchemist are helping things just automatically look nice. I'm here for it. 
    • She also uses the word 'opportunistic' to talk about her work. I love the idea of games being spontaneous, opportunistic, since it is traditionally such slow and unforgiving work.
  • The materials were gorgeous to look at anyways, and the Substance plugin was great to work with. Tri-planar projection solves SO many problems-- it improves on UV mapping (doesn't quite erase it except in simple scenarios), it unifies the world scale (so multiple assets can share the same material, plus a mesh can be scaled up / down without affecting the material). There are more features to talk about here, but all in all a total lifesaver. None of that back and forth targa export nonsense.
  • The layout pass (the 360 quick pass reconstruction) was EXTREMELY helpful. It served as a blueprint of the space to iterate on.
General takeaways.
  • Realizing most of these assets are better off modeled, like walls. 
  • Realizing that delighting is not just a 'clean' albedo, its also color matching and ensuring matched shaders. 
  • Realizing that polycounts are not as restrictive in my head
  • Restraining myself from brute force cleaning assets... I know I can make things look good if I sink hours into it... my goal is to determine best practices, not output a portfolio piece. 


Final polishing touches:


  • Water? in the foutain?
  • Obtain a HDR latlong image for the sky. Examples here:
    https://assetstore.unity.com/packages/essentials/beta-projects/unity-hdri-pack-72511
  • While I'm at it... actually I just wanna reshoot the whole thing again. This video from Gnomon https://www.youtube.com/watch?v=IU5XTtS6ALk demonstrates capturing an indoor, architectural space for VR. This trailer goes through the whole process in a timelapse.

    Looking at the camera icons, he just brute force shot a ton of photos. We can see some individual assets are processed, but mainly, he's working with this giant dataset. This is kind of opposite to my approach this term so I'm really interested in replicating it, especially with the 360 camera.


Friday, May 31, 2019

Quain Courtyard pt 3, Unity

In my last post, I developed ten materials in Substance Alchemist. Now it's time to start putting everything together in Unity.

I should also mention I've switched from working on the big machine to my personal laptop, so my graphics processing power has been cut in three (at least, haha). Still, my 15in Spectre is not too bad. I'd rather be targeting midrange PCs anyways.

The first thing I need to do is export all of my Alchemist materials out to something useable. I notice right away that I can't seem to consistently export 4K texture maps... Alchemist will crash. Although I was able to export two out of my ten materials. Perhaps a bug because it is still in Beta, or maybe my laptop. I notice 4K maps in the viewport will also crash. Either way, I'm stuck at 2K textures for now.
Another frustration is that I have NO idea where Alchemist is saving my working files, so the only way to get assets OUT is through the exporter. So at the moment, I cannot transfer my working documents to a more powerful computer (to rule out the weaker processing issue). To be fair, Allegorithmic warned us not to use their beta release in production, so I kinda asked for this.

Jumping ahead, later on I realize that the Substance Plugin for Unity reads SBSAR files. This is essentially a package of your texture maps. Its much easier / more accurate to implement these instead of the image files. Still though, I am clamped at 2K exports for whatever reason.
--


So now, I have a folder full of 2K SBSAR files. I did some investigating into current Unity project templates. I've been out of the game (pun intended!) for a little while now, so I kind of wanted to work on something more modern (again, probably asking for trouble).

I first looked into the High Definition Render Pipeline, which was used on the Fontainebleu demo (the same demo that published the expert guide on Photogrammetry for games).

I also looked into the Light Weight Render Pipeline, which is not the legacy renderer but instead, a newer and more optimized scriptable pipeline which targets a wider range of platforms, including mobile. Their demos seemed quite pretty as well, plus with some initial testing, ran totally fine on my laptop and played nicely with the Substance shaders. I chose this over the legacy renderer because the lighting is more sophisticated.

I went back and forth a lot here, and I'm still not totally convinced I'm settled into HDRP. I actually have three WIP versions started. One thing I was realllyyy hoping for was to get the shaders as close to the Substance preview as possible. Those sneaky bastards, the height maps really displace the geometry, which is not the case (as far as I know) in realtime rendering elsewhere. HDRP does have a height map channel and claims vertex displacement, but just like normal maps, it does not seem to alter the silhouette


The deciding factor was ultimately, that I really wanted the lighting quality and to follow the expert guide.

So now, I drag drop my ten SBSAR materials into my Unity project.


Notice the pink? So, the Substance plugin brings in your material as a standard shader. The standard shader belongs to the legacy renderer, and canNOT be rendered with the HDRP. So I need to open up each one and change it to the HDRP "Lit" shader, set the quality to 2048, and double check the maps. Most cases I had to plug them all back in for some reason.

Unfortunately, doing this breaks the thumbnail in the asset bin. :-(
This does not affect the material.


Concrete is expanded to show the HDRP material nested in the SBSAR ^^


For the frosted glass, first the Material Type needs to be set to Translucent.
Then, the base color needs an alpha value of <1. Simply click on the color picker icon and slide the A slider down to taste.


Another setting I really like in the SBSAR properties is the ability to switch between UV and Triplanar projection. Triplanar works great for static meshes, and essentially takes away the need for UV unwrapping with the click of a button.

I mock up a quick greybox version of the space based on the layout geo (generated with the 360 camera)


Honestly I could have done this step in Unity, but I work faster in Maya. I limit myself to about 30 minutes on this step. I use Maya's Game Exporter to export all objects as seperate fbx's (check plugins list if you don't see it under File).


I import back into Unity.
Couple of noob notes for myself RE moving an entire scene into Unity

Maya to Unity:
1. do not freeze transforms in Maya (Modify>bake pivot to get transforms back)
2. export all separately using Game Exporter
3. import into Assets. select all and check the Convet Units checkbox
4. drag into hierarchy. Everything should be in its place


Again, first import the rough layout geo... (iterative design!)

Then everything else. I'm glossing over a few steps here, but I did a quick pass at applying all the materials and tweaking them a bit.


and this is a screengrab, without the layout geo.
A couple of obvious things stick out right away. 

First, there are obviously tiling materials. This is a little in part that they are placeholder, and I'm using them on objects that a much larger than what I intend for the final assembly. 
Still though, I had a lot of problems with scale. I had to manually tweak each material to look right. I realize that I really needed to take real world measurements and plan ahead for texel density. Unity says to take a 1 meter square of any material scan. I grabbed whatever I could get. 
Second, my placeholder geo kinda sucks. haha. I would have been better off with cubes I think? It's actually related to the scale issue, I added bevels without thinking about how noticeable they look.

The postives are, its starting to come together! The rendering and post processing are really really nice. It does't look like a typical "unity student project" that I have noticed is really common in Unity games (even Overcooked has symptoms of this... something about lacking antialiasing, color correction, dinky looking shadows and shaders that falloff to black? I can't totally put my finger on it but there's definitely a look to the legacy renderer.)

Walking around the space is starting to feel like the space. Getting up close to the bricks is actually kind of exciting. 

Next post I'm going to implement the scanned assets... stay tuned!


Friday, March 22, 2019

The Cemetery Hill - Final write up


Above: a screencap of the cemetery hill environment in Unity.

  • The fence is a geo asset reconstructed from scanned object data
  • The ground is a tileable material asset reconstructed scanned ground data
  • Audio is white noise was recorded same day on location
  • A particle emitter to mimic seedlings being blown off a tree (documented from that day) to demonstrate dynamic shadows
  • Statue is a previously scanned asset (reconstructed from scanned object data) which is NOT true to the location to demonstrate combining scanned assets
  • a default cube, for lighting comparison
  • Lighting setup is a simple directional light and gradient skybox. 

Critical analysis:


Bad input = bad output
  • There are obvious issues in model and texture quality, which can only be solved with better data capture. Admittedly, I began shooting this location in the late afternoon, which made me feel rushed. The benefit was that it was cloudier (therefore, more diffuse lighting) but I relied too much on burst shutter mode and was sloppy in photographing.
  • This brings up an important point: I wish I spent more time in the data capture phase of my research for this term. I don't feel closer to perfecting the (already documented) methods, instead I felt rushed to output assets and get back into software side. In the end I didn't feel ready to talk about rendering because I was being sloppy upfront and not testing all the tools I have available to me. Bad input = bad output, and there are no good renders without good data.
The tileable material doesn't look like ground
  • Yeah, see above. Need a tripod, manual shutter, and more time.
  • There was also a lot of wind that day, which is not an ideal condition.
The statue looks out of place
  • This is another case of bad input = bad output, but I can get a little more specific here. First, this was shot on my phone instead of a proper DSLR. The albedo was not completely clean and color matched to the scene, however with more time both of these can be finessed to perfection. In my last post I demonstrate how I can use Substance Designer to achieve a clean albedo, then reuse the template on different assets.
The seedlings are just planes
  • I know, it's placeholder. This kind of asset is an example of something that would be better box modeled, and for this demo that's a skill I didn't think was necessary to demonstrate. Plus, the real reason this was included was to show something animated with dynamic shadows.

Successes:

I'm happy with the way the space is taking shape
  • The organic feeling (that usually takes SO long to replicate) is almost instant in scanning. The space has a distinct 'character' to it that feels natural. Popping the white noise track in made the whole scene come alive. Plus, the process on this project has been FAST, this is the product of less than a total week of work hours. 
I'm happy with the direction of my research
  • I am starting to see the path of how to get from where I currently am to here https://www.youtube.com/watch?v=hCeP_XUIB5U. I think it's important to emphasize that I am still replicating these scanning methods (which Unity has thoroughly documented and published). It turns out that there are already some pretty big shoulders to stand on. 
  • I've greatly enjoyed working closer with Unity and realtime art-- something I was never formally trained in and want to continue learning. 
  • Posting about my work has helped me get involved in other scanning projects around the school, and there does not seem to be any shortage of them. 
--

Looking ahead to next term, I hope to be able to increase the quality of scans and get results that are closer to the Unity Fontainebleu demo. 
I would also like to define a more specific and meaningful production that would fit into the thesis model.
I am not so worried about producing an effective tech demo as I am about making interesting interactive art. One fear I have is that I am entering my third term without having any discussions about art making and art direction. I hope this is to come before its time to propose our thesis. 
For that reason, next term I am hoping to continue researching best practices in scanning tech, but also look into areas such as installation art, interactive art, VR. 

Monday, March 18, 2019

The Cemetery Hill - proof of tech

One thing that I like about working with scanning is that it is easy to work iteratively and BIG to SMALL. It's easy to quickly generate a sparse pointcloud of the entire space (esp with 360 cameras), then refine per object to smaller, denser pointclouds. Then lastly, each asset can be optimized and made beautiful for a realtime environment. 

I feel good about ending out the term with a workflow that makes sense and can show results in just a couple of days. The Cemetery Hill project is just at the beginning, but the proof of tech can already be presented.

Quain Courtyard pt 4, mild success